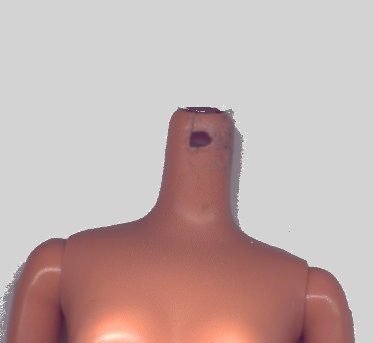
When the neck joint breaks in Mattel's Barbie, an inner pin (in the neck) usually pulls out leaving a hole in the throat that looks like a tracheotomy. The appearance of the neck usually remains intact except for cracks. A trake is a figure in this condition. It is necessary to fix this problem when a suitable replacement is not easily available, such as Mattel's discontinued articulated body. To reduce the chances of breaking the neck joint, in the first place, see my article, "Saving Barbie's Neck..."
First, if you have the neck joint in the head, remove it and the broken inner pin.
At this point, glue the cracks in the external neck back together and let dry. I used a superglue for plastic called "Plastic Surgery." You can glue the external portion of the inner pin to patch the hole, but cut off and do NOT restore the inner pin. If that piece is lost, you can patch the hole later with some kind of putty compound, such as "Apoxie Sculpt."
[edit: I was able to rebuild her shattered neck using J-B Weld PlasticWeld epoxy putty. I first inserted a piece of plastic straw into her neck hole. (This epoxy does not stick to the polypropylene straw.)]
Materials you will need:
5- 4"x1/8" cable ties
One- 3/8" dia. metal washer w/ 1/8" dia. hole [I used a Size/No.16- 7/16" snap]
If the hole of the washer is too big,
One- smaller washer w/ 1/8" dia. hole.
Wire cutters [or something to cut the cable ties.]
Underneath the missing inner pin, inside the neck, there is a connection between the top of the chest and the back. Let's call it the collar joint [Fig. 1].
Tie a cable tie tight around the collar joint. Do NOT cut the tail of the tie. Leave it sticking out of the top of the neck.
"How?" you may ask. Before sending the tie in, fold about 1 ¼" of it back on itself [Fig. 2]. Insert it just far enough for the tip to spring over to the other side of the collar joint and pull it back out. At this point, you can grab the tip of the tie and slide it through the "knot" end as normal. Pull it tight.
Take the knot of tie #2 and slide it onto the tail of tie #1 a short way [Fig. 3].
Make sure the knot cannot be slid back off. If it can, you put it on backwards. If so, just slide it off, and try again.
Cut tie #2 leaving only the knot [Fig. 4] and slide it down as far as it will go with tools, if necessary. Repeat process for tie #3.
For me, the top of knot #3 rose a little above the top of the neck [Fig. 5]. If it is below that level, add another knot.
Place the main washer on next, followed by the smaller washer, if necessary. The main washer should have its flat side down, if there is a difference.
Add two more knots, as before. Clip the remaining tail of tie #1 and the new neck joint is complete.
SEE ALSO:
Prior URLs
http://www.geocities.com/s6xtiliana/Babs/Trake-Fix.htm
http://babs-poser.u.yuku.com/blog/post/id/1277
http://babs-poser.u.yuku.com/bloggy/post/pid/1277
http://www.geocities.com/s6xtiliana/Babs/Trake-Fix.htm
http://babs-poser.u.yuku.com/blog/post/id/1277
http://babs-poser.u.yuku.com/bloggy/post/pid/1277
Worked like a charm! Thanks for helping to make me look like a hero to my 6 year old daughter! :-)
ReplyDeleteGlad to hear it.
Deletethats not repairing the hole though.the pin and neck above are gone.
ReplyDeleteThis tutorial restores neck functionality. If you still have the broken out pin, you can cut off the part that fits the hole and glue it back in. (This anchor is stronger than the factory pin.) If you don't have the pin, there are various fillers available, like the aforementioned Apoxie Sculpt (which I have not yet used).
Delete